

.svg)

.svg)
.svg)
.svg)
.svg)
.svg)
Have you ever had questions about HTML elements and how to use them effectively? Well, look no further! In this blog post, we'll walk through everything you need to know about HTML elements: what they are, their purpose in website design, and how to use them properly.
We'll also learn the basics of code syntax fundamentals so that you can write HTML confidently like a pro.
So grab your favorite mug of hot cocoa and get ready for an amazing journey into understanding HTML elements!
Overview of HTML and Its Place in the Web Development World
HTML, which stands for Hyper Text Markup Language, forms the skeletal structure of virtually every website you see on the Internet. An HTML element is the individual component of an HTML document or web page.
It's crucial in web development because it provides the raw materials that CSS and JavaScript transform into a visually appealing and interactive site. These elements, functioning as the backbone of web content, allow us to structure our sites, including content like images and videos, and create links to other parts of the site or different websites altogether.
So, understanding HTML is not just beneficial, but essential for anyone looking to delve into the world of web development.
Understanding HTML Elements: What They Are and How They Work Together?
HTML elements form the building blocks of all websites. They are the smallest units of HTML, each with a specific purpose and functionality. An HTML element typically consists of a starting tag, content, and an ending tag.
The tags are the coded instructions that define the element and its attributes, while the content is what is displayed on the webpage. For example, the '<p>' element is used to create a paragraph, and it would look like this: '<p>This is a paragraph.</p>'.
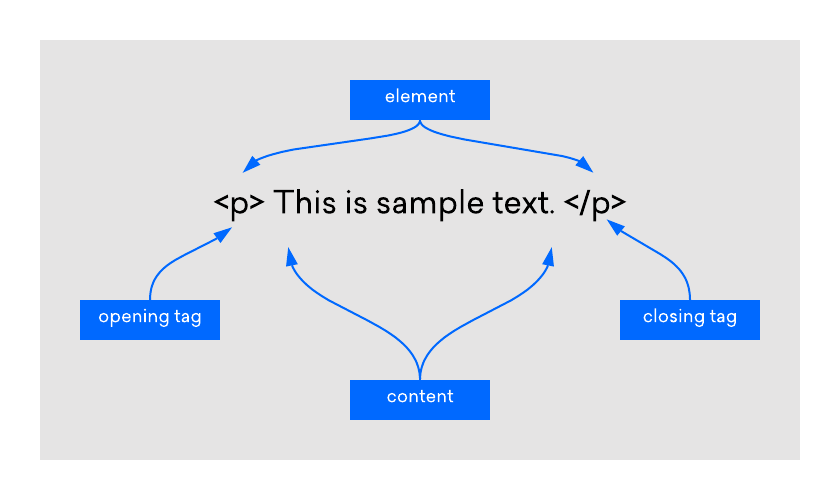
Image Source: DigitalOcean
Each element plays a unique role in shaping and structuring the webpage. Images, links, text, forms, and even the layout are all created using different HTML elements. They work together seamlessly to create the structure and content of the webpage.
By appropriately nesting these elements within each other, developers can create complex web designs. For instance, the '<a>' element, defining a hyperlink, can be nested within a '<p>' element to create a clickable text in a paragraph.
Understanding how these elements work individually and in combination with each other is a fundamental part of web development. With a solid grasp of HTML elements, you can create websites that are both visually compelling and functionally robust.
Common HTML Elements
Let's now delve into some commonly used HTML elements:
- '<div>': The '<div>' element, short for division, is a container unit designed to structure and group larger sections of HTML elements. It's a block-level element that assists in creating more complex layouts in conjunction with CSS.
- '<span>': Similar to '<div>', the '<span>' element is an inline container used to mark up a part of a text, or a part of a document. It's often used for styling purposes with CSS.
- '<img>': The '<img>' element is used to embed images into webpages. It uses the 'src' attribute to indicate the image source and the 'alt' attribute to provide alternative text for those who cannot see the image.
- '<a>': The '<a>' element defines hyperlinks, which are used to link from one page to another. The most important attribute of the '<a>' element is the 'href' attribute, which indicates the link's destination.
- '<ul>', '<ol>', and '<li>': These are list elements. '<ul>' creates an unordered (bulleted) list, '<ol>' creates an ordered (numbered) list, and '<li>' defines a list item.
- '<table>', '<tr>', '<td>': These elements are used for creating tables. '<table>' is used to create a table, '<tr>' is used to create table rows, and '<td>' is used to create table data.
- '<form>', '<input>', '<button>': The '<form>' element is used to create an HTML form for user input. '<input>' is used for input fields, and '<button>' is used to create clickable buttons.
- '<br>': The '<br>' element is an example of an empty HTML element. It is used to insert a line break in a text, which can be useful for formatting purposes. Because it is an empty element, it does not contain any content or have a closing tag. It would look like this: '<br>'.
Understanding HTML Attributes: Enhancing Elements
HTML attributes are special words used within the opening tag of an HTML element to control the element's behavior or provide additional information about it. They generally come in name/value pairs like ‘name="value"’. They enhance the capacity of an HTML element, allowing it to perform more complex tasks. For instance, the '<img>' element uses the 'src' attribute to specify the source of an image and the 'alt' attribute to provide alternative text if the image can't be displayed.
Another commonly used attribute is the 'href' attribute in the '<a>' element, which is used to specify the URL of the page the link goes to. Similarly, in the '<form>' element, the 'action' attribute specifies where to send the form data when a form is submitted.
HTML attributes add another layer of versatility to HTML, making it a powerful tool capable of creating rich, interactive, and dynamic websites. They provide a way to tailor HTML elements to our specific needs, giving us more control over the structure and functionality of our web content. Given their importance, understanding how to use attributes effectively is a crucial part of mastering HTML.
Nesting HTML Elements: Building Complex Structures
In HTML, nesting refers to the practice of inserting an HTML element within another HTML element. This is a common scenario in web development and is key to creating complex layouts and designing intricate web pages. The enclosed element is known as the 'child', while the enclosing element is termed the 'parent'.
For instance, consider the simple construction of a list in HTML using the '<ul>' (unordered list), and '<li>' (list item) elements. The '<li>' elements are nested within the '<ul>' element:
''HTML
<ul>
<li>This is the first item</li>
<li>This is the second item</li>
</ul>
''
In the example above, '<ul>' is the parent element, and the two '<li>' elements are the child elements. It's important to note that HTML elements must be properly nested. Proper nesting ensures that child elements are closed before their parent element is closed. Improper nesting can lead to unexpected layout issues and make your HTML harder to read and maintain.
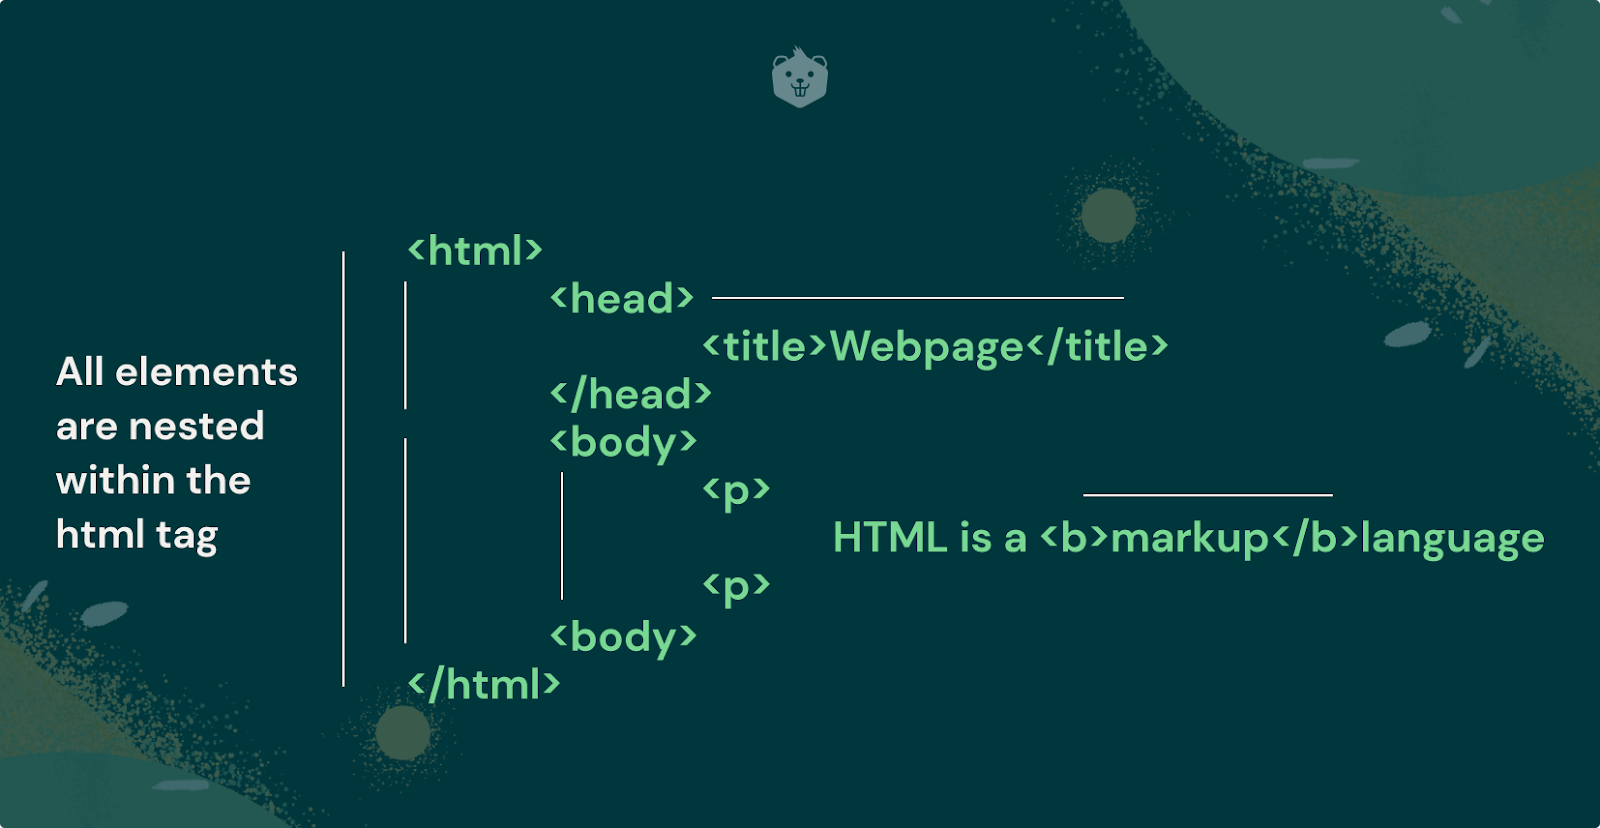
Image Source: Crio
Nesting is not limited to a single level; you can nest elements within nested elements to create a hierarchy of elements. However, while nesting elements, you must adhere to the HTML schema, which dictates what elements can be nested in other elements and the correct order of the elements. Understanding and applying the concept of nesting in HTML is vital for creating structurally sound and well-organized web pages.
Understanding and effectively utilizing these HTML elements can help you create a variety of dynamic and interactive web pages.
Tips for Organizing Your HTML Code Structure for Maximum Readability
When working with HTML, it's essential to maintain a clean, organized code structure for maximum readability and efficiency. Here are some tips to consider:
1. Indentation
Always indent child elements inside parent elements. It makes it easier to read your code and understand the parent-child relationships between elements.
''HTML
<div>
<p>This is a paragraph inside a div element.</p>
</div>
''
2. Comments
Use comments to label sections of your code. It can be especially helpful when you're working on large projects or collaborating with other developers.
''HTML
<!-- This is a comment -->
''
3. Naming
Choose clear, descriptive names for classes and IDs. Names should reflect the purpose of the element, not its appearance.
''HTML
<div id="navigation">...</div>
''
4. Consistency
Be consistent with your coding style. Whether it's the naming scheme, indentation, or syntax, consistency makes your code easier to read and understand.
5. Semantic HTML
Use semantic HTML elements when possible. Semantic elements like '<header>', '<footer>', '<article>', and '<section>' make your code easier to read and help search engines understand your content.
6. Group Related Elements
Group related content into a '<div>' or '<section>'. It helps make your structure clear and logical.
''HTML
<div class="header">
<h1>...</h1>
<nav>...</nav>
</div>
''
7. Avoid Inline Styling
Keep your HTML and CSS separate. Inline styles can make your HTML file messy and difficult to maintain. Instead, use a separate CSS file or a '<style>' tag in the '<head>' section.
Remember, a well-structured and organized HTML document makes your code easier to read and maintain and increases the performance of your website. Be sure to use an HTML code validator to ensure that your website's HTML code meets current standards and is free of errors. This step is crucial for proper website display and enhances the user experience. Additionally, having error-free HTML code can help improve your search engine optimization.
Adding Additional Information With HTML Attributes
HTML attributes provide a way to add more information to HTML elements, thereby modifying their default functionality or appearance. Attributes are always specified in the start tag and are often paired with a corresponding value.
For example, to change the color of text within a paragraph, you can use the 'style' attribute and specify the color value as follows:
''HTML
<p style="color:blue;">This is a blue paragraph.</p>
''
In this example, 'style' is the attribute name, and 'color: blue;' is the attribute value. It will render a paragraph with blue text on your webpage.
Another common usage of attributes is to specify the source of an image file for the '<img>' element. The 'src' (source) attribute is used to include the image file location:
''HTML
<img src="image.jpg">
''
Here, 'src' is the attribute name, and 'image.jpg' is the attribute value, which is the path to the image file.
It's important to note that some attributes are specific to certain HTML elements. For instance, the 'href' attribute is specific to the '<a>' element (the link element). The 'href' attribute specifies the URL the link directs to:
''HTML
<a href="https://www.example.com">Visit our website</a>
''
In this example, 'href' is the attribute name, and 'https://www.example.com' is the attribute value representing the URL.
HTML attributes significantly enhance the functionality and versatility of HTML elements, enabling you to create complex, interactive, and dynamic web content. Understanding how to use them effectively is a crucial part of mastering HTML.
Best Practices for Using CSS Alongside HTML to Enhance User Experience
CSS (Cascading Style Sheets) is a critical tool used alongside HTML to design and beautify web pages. It provides the styling and layout of HTML elements, enhancing the visual aspect of the web page and significantly improving the user experience. Here are some best practices for using CSS with HTML:
1. Use External Stylesheets
External stylesheets are the preferred method for applying CSS. They promote reusability and help keep your HTML files clean. Create a separate CSS file and link it to your HTML document using the '<link>' tag in the '<head>' section.
''HTML
<head>
<link rel="stylesheet" type="text/css" href="styles.css">
</head>
''
2. Use CSS Selectors
CSS selectors enable you to select and style HTML elements. They can be element types ('p', 'div', 'h1'), class names ('.intro', '.highlight'), or ids ('#header', '#nav').
''CSS
p {
color: blue;
}
.highlight {
background-color: yellow;
}
#header {
height: 60px;
background-color: #333;
}
''
3. Leverage the Cascade
CSS is cascading, meaning that styles can be inherited or overridden. Use this feature to your advantage by defining global styles for common elements and then specifying or overriding these styles for individual elements when necessary.
4. Use Shorthand Properties
Shorthand properties allow you to set multiple CSS properties in one line. It can make your CSS more compact and easier to read.
''CSS
/* Instead of this */
margin-top: 10px;
margin-bottom: 20px;
margin-right: 30px;
margin-left: 40px;
/* Use this */
margin: 10px 30px 20px 40px;
''
5. Group Selectors
If multiple selectors share the same style, group them to avoid repetition.
''CSS
/* Instead of this */
h1 {
color: blue;
}
h2 {
color: blue;
}
p {
color: blue;
}
/* Use this */
h1, h2, p {
color: blue;
}
''
6. Use Comments
Use comments to describe your code, especially for complex parts. It will help others (and your future self) understand your code better.
''CSS
/* This is a comment */
''
7. Organize Your CSS File
Keep your CSS file well-organized. You could group styles by element type, or by page section (header, main content, footer). Consistency is key.
Remember, the power of CSS lies in its ability to separate the design and layout from the content. This separation makes your HTML more maintainable, your styles more reusable, and your web page more accessible. And most importantly, it allows you to create a more pleasing and immersive user experience.
Further Reading: 8 Website Design Mistakes to Avoid When Building or Revamping Your Website
The website builder software by DashClicks is a powerful tool that can significantly streamline your web development process. By offering a robust and user-friendly platform, it allows you to create stunning, professional-grade websites with ease and speed.
The software is equipped with a wealth of pre-designed templates, meaning you don't have to start from scratch. You just have to choose a suitable template, add your content, and customize the design to fit your brand. The white label website builder also supports responsiveness, ensuring your website looks great on all devices.
Furthermore, it provides seamless integration with several third-party applications to extend the functionality of your websites. With the software, you can manage your web development projects more efficiently and deliver outstanding results to your clients.
Wrapping Up!
In summary, HTML is an essential part of web development. By understanding the fundamentals of HTML such as elements, attributes, and best practices it’s much easier to create a webpage. Allowing you to choose different HTML elements and customize them properly with attributes is the key to great design and user experience.
It’s also essential to understand how cascading style sheets (CSS) work to create beautiful interfaces with HTML. With a strong understanding of basic and advanced concepts in HTML, you can start crafting amazing websites today!
If you want even more tips on how to get started learning HTML then visit my blog for more content about web development!


.svg)


.svg)
.svg)
.svg)
.svg)
.svg)