

.svg)

.svg)
.svg)
.svg)
.svg)
.svg)
Managing business assets on Facebook can be overwhelming. Facebook Business Manager can make things easier for businesses and marketers. It offers a centralized dashboard through which you can manage and organize your FB business assets and keep them safe.
The many detailed specifications needed to use a social media tool may prevent a beginner from getting it right. So, here we give you a low-down on everything you need to know about Facebook Business Managerā its features, mistakes to avoid, and a step-by-step guide on how to set up the account.
What's Facebook Business Manager?
It is not just a tool; it is a centralized platform to manage all your business assets, marketing, and advertising activities on Facebook. It allows you to do it all through a single dashboard, provide and control multiple user access to product catalogs and FB-owned platforms such as Instagram. It lets you:
- Keep your personal and business accounts separate, so you can avoid errors such as accidental posting and stay away from distracting personal feeds when working.
- Track and control your Facebook ads from a single dashboard and get detailed reports and analytics of your ad’s performance.
- Give employees or clients access to your Facebook pages and ads without transferring asset ownership.
- Keep personal information hidden from coworkers. They can only see your name, pages, ad accounts you own, and your work email.
Setting Up a Facebook Business Manager Account
Step 1. Create a Facebook Business Manager Account
Like Google, Facebook also needs you to have a personal account on it before creating a business account. Facebook needs a personal profile to confirm your identity. However, your coworkers and vendors will not have access to this information.
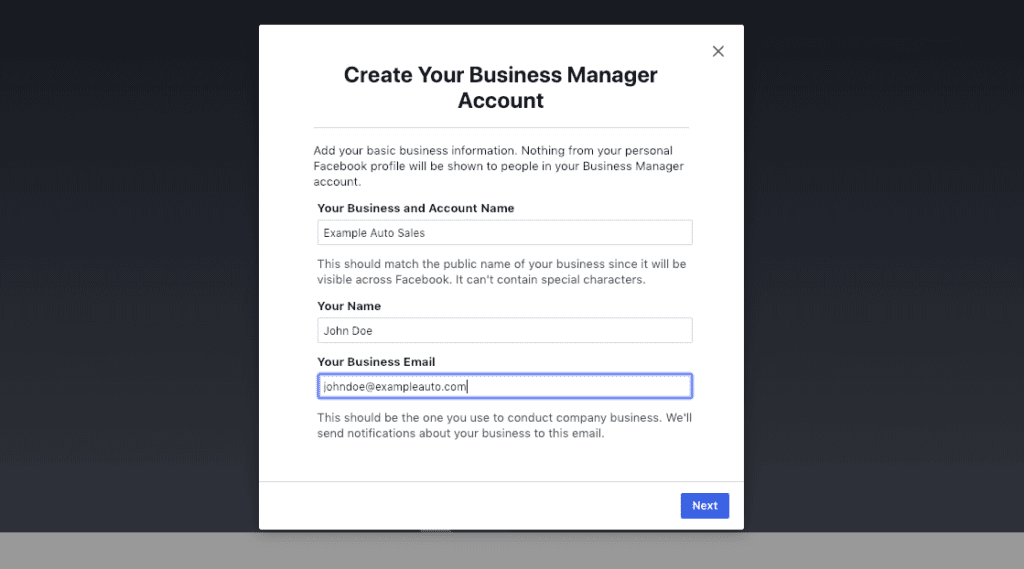
- Go to Facebook Business Manager’s homepage and click on the blue button Create Account. It’s at the top right corner.
- Enter your business name and email address in the relevant fields and click on Next.
- Enter other business credentials, including your postal address, zip code, and the country you are running your business in.
You now need to check your inbox for an email by Facebook. Its subject line would be — “confirm your business email.” Open it and click on the Confirm Now link.
Step 2: Create or Add Your Facebook Business Page
For this, you will find various options. You can create a new Facebook business page or add an existing one. If you want to manage a business page for a client, you can request access to it.
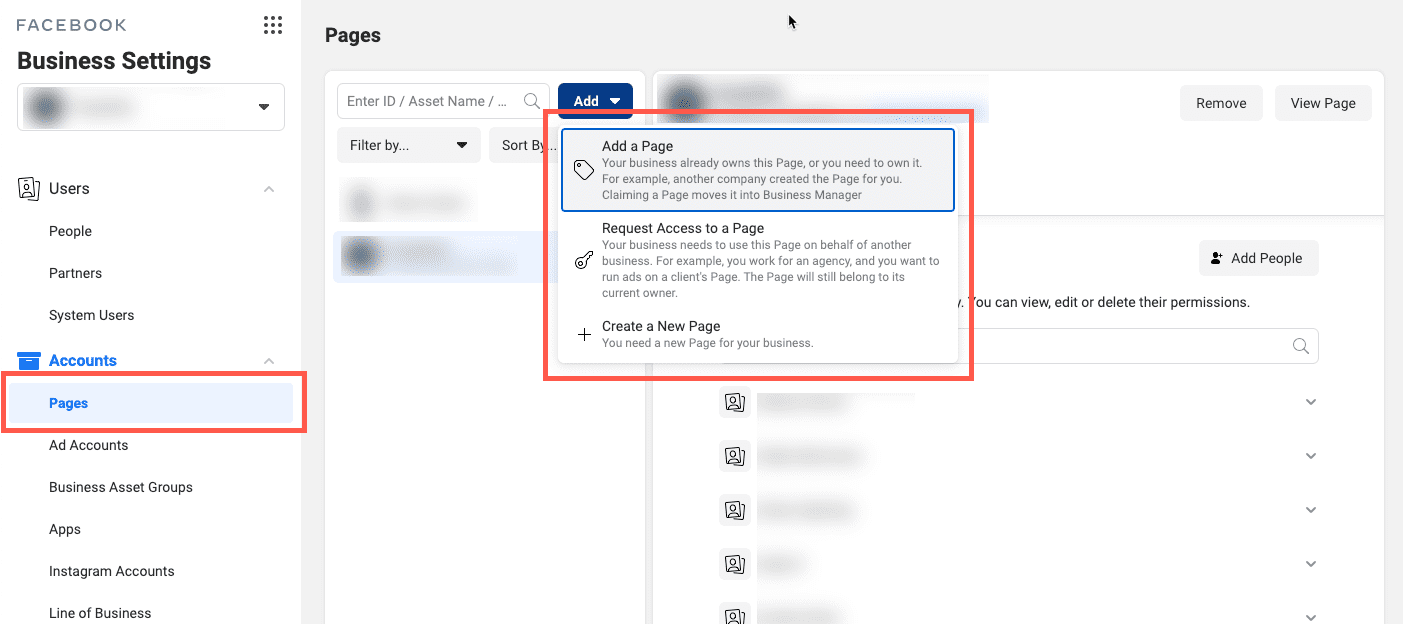
You have to use the Add Page option only in case you are adding your own page. If you want to manage your client's Facebook page and ad account, click on the Request Access option. Once you get access to manage your client's page and ad accounts through Business Manager, their access will reduce, and they will not get to use many of their business assets. So, inform your clients beforehand to avoid any stalemate.
To add your Facebook page to FB Business Manager:
- Head to the dashboard and click on Add Page. Remove any popup blocker you may have, as a popup will appear just after you click on the Add Page button on the Set Up Your Business Manager page.
- Type your Facebook business page's name in the text box. This column has an autocomplete feature; you just need to click on it to add and confirm that you have chosen the right business page. If you have admin access to the page, you can add it to your Business Manager account as soon as you click on Add Page. Follow the steps on the screen to add multiple Facebook pages.
Step 3: Add Your Facebook Ad Account
Once added to your Business Manager, you cannot remove the ad account. Therefore, you must add your own account only. If you have an existing Facebook ads account, here's how you can link it:
1. Open your FB Business Manager dashboard, click on Add Ad Account and then click on it again. Go to the Ads Manager, find the ad account ID and enter it.
If you don't have an existing Facebook ad account to connect, you can go to the Business Manager dashboard and click on Add Ad Account and then click on Create Account.
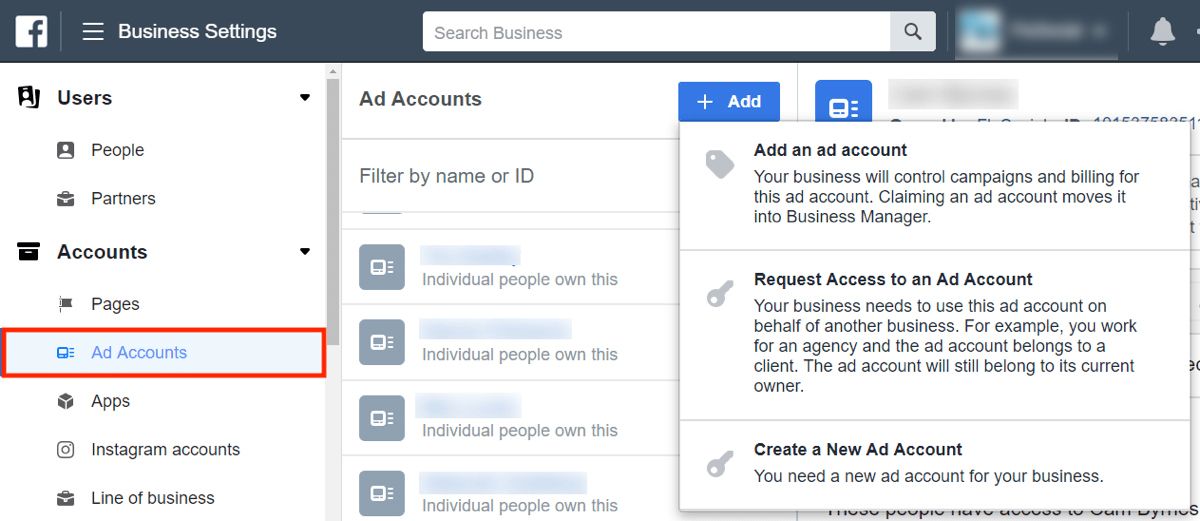
- Enter your ad account details and click on Next.
- If you are using this account for your own business, mention it here. Click on Create.
Facebook allows you to create one ad account for your business. But if you regularly spend money on this account, you can add more accounts based on your ad spend. However, you can't request more ad accounts when starting out.
Or Request Access to a Client's Page
As emphasized above, Facebook also allows you to access your client's accounts. To request access to your client's business page, you need to ask for their permission first. You do not get complete ownership of their business page; Facebook would restrict your access to performing specific predefined tasks. So, you can view, run ads, and comment on your client's page. It will be visible on your Business Manager, but the page will have your client's business name.
To request access to a client's page:
Go to Business settings >> click on Pages (below Accounts) >> click on the blue Add drop-down button >> select Request Access to a Page >> Enter the Facebook Page name or URL >> Choose which permissions you need using the toggle buttons >> click on Request Access.
You'll see the page in your FB Business Manager only after the admin approves your request.
Step 4: Add People to Manage Your Facebook Assets
You may need to assign your business's Facebook marketing to other people. Facebook Business Manager allows you to add team members to handle ad campaigns. To do it:
- Go to the dashboard and click on Add People
- Enter these people’s business email addresses in the popup box
Apart from employees, you can also add freelancers and agencies. Depending on your requirements, you can give your ad account's limited or full access to other people. Limited access is usually given to employees, whereas the admin has full access.
Once you are through with this, click on the Next button.
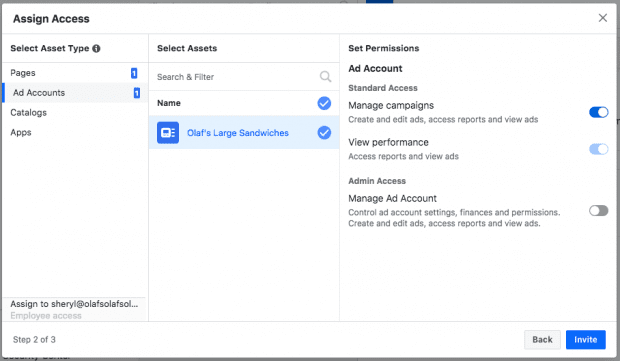
- When you are on the Assign Access screen, select Pages from the Select Asset Type menu. Choose the Facebook pages you want to assign to this particular team member. Use the toggle switches to customize their access.
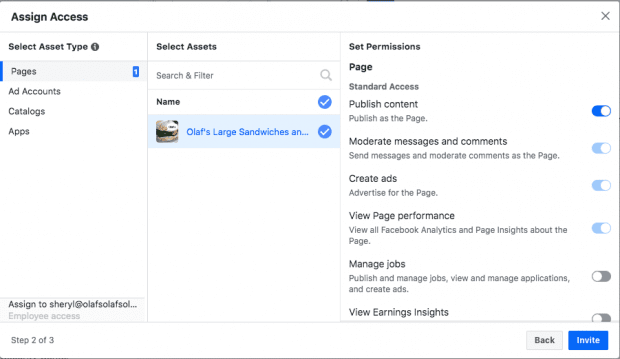
- Go back to the Select Asset Type menu and click on Ad Accounts. You can add more accounts you want this particular member to work on and use the toggle switches to customize their access. Once done, click on the Invite button on the bottom right.
- Similarly, you can add more people to handle these accounts from the dashboard.
- These people will get the invitation to join your Business Manager team via email. You will have to wait for them to confirm to complete the process.
They will have to click on the link received in the email to get started. However, we recommend you also send them a personal message via social media or a messaging app they use.
You can use your dashboard to see pending requests; it gives an overview of people who have responded and those who haven't. You can remove anyone at any point. To do it:
- Go to the Business Manager dashboard, click on Business Settings
- Go to the left menu and click on People
- Click on the names of the people you want to remove, and then click on Remove.
Now go to the specific asset the employee was involved with and click on the "trash can icon" to remove them altogether.
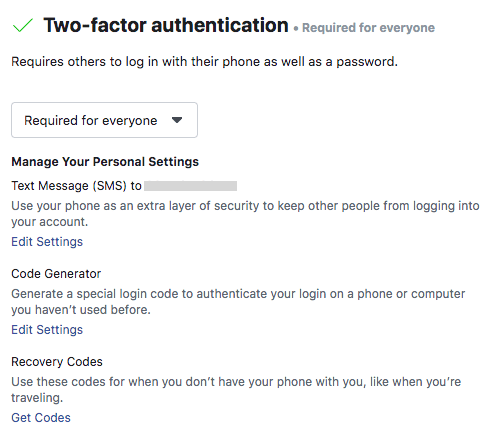
Step 5: Add Another Layer of Security to Your Account
Facebook Business Manager allows you to add an extra layer of security to your business account. To do it:
1. Go to the dashboard and click on Business Settings
2. Click on Security Center from the left-hand menu

3. Set up the two-factor authentication and choose the settings Required for Everyone to enable maximum security for your account.
Creating Your First Campaign on FB Business Manager
Your account is set up. Now you are ready to create highly effective Facebook ads and launch them. To start your first ad campaign on FB Business Manager:
- Go to the dashboard and click on Business Manager
- Click on Ads Manager under the Advertise tab and then click on the green Create button.
You can choose your target audience and campaign objective. You can also set your budget and schedule your ad in much the same way you do when setting up Google ads. You can also choose the specific ad types you want to run and their placements. To know more about how to set up a campaign, click here.
Organizing Facebook Business Manager
When the number of assets increases, it becomes challenging to use Facebook Business Manager. Therefore, you must create business asset groups to organize your ad accounts, pages, and team members.
How to create your first business asset group?
- Go to the dashboard and click on Business Settings
- Go to the left menu and choose Business Asset Groups under Accounts and then click on Create Business Group
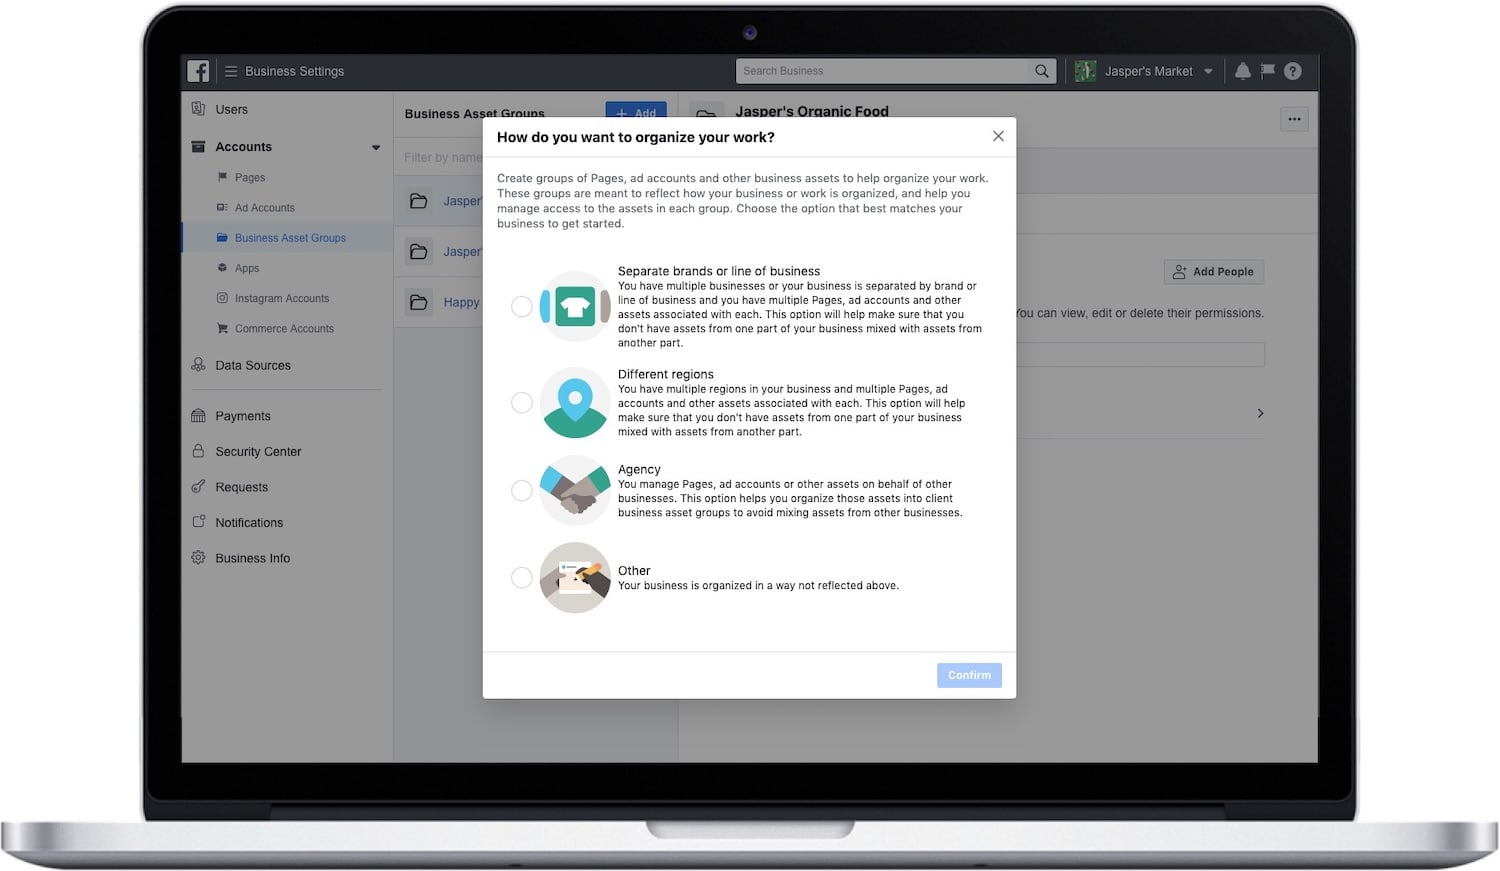
You will get various options to organize your assets based on regions, brands or businesses, agencies, and others. Choose the suitable options and click on Confirm.
Give this business asset group a name, and click on Next.
Now choose the business assets you want to move to this group. These can be pixels, ad accounts, pages, and Instagram accounts. You can also add people, custom conversions, apps, catalogs, and offline events. Once you are done, click on Next.
At this stage, you have got everything streamlined and controlled from one dashboard. You are now ready to use Facebook Business Manager to get the best results and ROI for your Facebook ads.
Mistakes to Avoid When Using FB Business Manager
If you're struggling to get the desired results from your Facebook ad campaigns, you should avoid the following mistakes.
1. Optimizing Facebook Ads Frequently
Rather than tweaking your ads often, you should build a sales funnel based on three stagesāawareness, consideration, and conversion. Identify the ad strategy that works best in each of these three stages. Invest your money consistently into those strategies.
2. Targeting Without a Plan
When marketers resort to lazy and imprecise targeting, their campaigns stop yielding results. Therefore, you must go for refined demographic targeting with multiple interests and behaviors. Don't narrow down your audience much initially. Negative feedback about your ads can hurt their performance adversely.Ā Ā
3. Not Focusing on Your Prospect's Pain Points
Ads should be customer-oriented and address their pain points. Craft your ads in a way that targets their problem areas and offers them a worthwhile solution through your product or service.
4. Going for General Ads Placement
Consumers have a short attention span. One size fits all approach doesn't work with ad placement. Therefore, customize your ad creatives to fit the placements. You should also optimize your video ads according to the platform or device you are running them on for the best results.


.svg)


.svg)
.svg)
.svg)
.svg)
.svg)